InfluxDB IoT dev guide
Introduction
Notice
🚧 This guide is a work-in-progress.
This guide is for developers looking to write Internet-of-Things applications using the InfluxDB platform. InfluxDB provides an API for programmatically writing, querying, and managing time series data.
We’ll describe the concepts, architecture, functionality, needed to build an IoT times series application. Then we construct the code, piece by piece.
Who should read this guide
Anyone interested in building web applications for IoT and times series data collection.
This guide is targeted toward moderately experienced developers (Those who have a built a web application before, know some JavaScript, or have coded with APIs), although beginners should be able to learn from it as well!
How to use this guide
The guide is written to be read from beginning to end, but can be browsed as well. You’ll want to get the example application source code. The code for this application is meant to be read with this guide. We'll walk through writing the most important bits of the code, but some assembly is required. We provide the example application as a reference implementation.
Key concepts in InfluxDB
The following concepts are essential for working with InfluxDB. They are at the core of the way it writes, stores, and accesses time series data.
Read the docs 😎📘
Throughout this guide we will link to the InfluxDB documentation, which contains a wealth of useful information.
If you are new to InfluxDB, you might want to familiarize yourself with installing and writing data with InfluxDB first.
Line protocol
Line protocol is InfluxDB’s data input format.
Use line protocol format to write data into InfluxDB. Each line represents a data point. Data points contain tags and fields.
Example
Here is an example of line protocol:
environment,devId=b47f6944 Temp=21.00,Lat=50.087325,Lon=14.407154 1603091412
White space, commas, and position all have important meanings in line protocol. Let’s examine the parts of this line.
environment,devId=b47f6944 Temp=21.00,Lat=50.087325,Lon=14.407154 1603091412
|         | |            | |                                    | |        |
+---------+ +------------+ +------------------------------------+ +--------+
measurement tags           fields                                 timestamp
The measurement comes first and must be followed by a comma. After the comma is a tag set, then a space, followed by a field set. The timestamp is optional and comes after another space. If a timestamp is not provided, the current time is used.
InfluxDB resources
The code in the example application frequently uses the following four concepts.
User
InfluxDB users are granted permission to access the database. Users are added as a member of an organization and use authentication tokens to access resources.
Token
Tokens (or authentication tokens) verify user and organization permissions in InfluxDB 2. There are different types of athentication tokens:
- admin tokens grant full read and write access to all resources in all organizations1
- all-access tokens grant full read and write access to all resources in an organization
- read and write tokens grant read or write access to specific resources in an organization
Bucket
A bucket is a named location where time series data is stored. All buckets have a retention policy, a duration of time that each data point persists. All buckets belong to an organization.
Organization
An organization is a logical workspace for a group of users. Members, buckets, tasks, and dashboards (along with a number of other resources), belong to an organization.
Cardinality
Performance in accessing time series data can be affected by the cardinality of that data. In InfluxDB, the primary concern is series cardinality.
Flux
Flux is InfluxDB’s scripting language. Flux code can be sent by other code as strings to be executed by the InfluxDB API.
A simple query might look like this:
from(bucket:"example-bucket")
  |> range(start:-1h)
  |> filter(fn:(r) =>
    r._measurement == "my-measurement" and
    r.my-tag-key == "my-tag-value"
  )
Query data from a bucket with the from() function. The range() function filters records based on time bounds. The filter() function filters data based on conditions defined in a predicate function (fn).
You can use Flux for a variety of tasks including but not limited to:
- data transformations
- data analysis
- writing custom tasks, checks, and notifications
InfluxDB Cloud does not support admin tokens.
Annotated CSV
An Annotated CSV is the output format of a Flux query with InfluxDB 2.0.
For example, imagine that we’re writing data about the number of “calico” and “tabby” cats, both “young” and “adult” cats, in two shelters, “A” and “B”. The data layout looks like this:
| Bucket | Measurement |
|---|---|
| “cats-and-dogs” | “cats” |
| Tag Keys | Tag Values |
|---|---|
| “shelter” | “A”, “B” |
| “type” | “calico” , “tabby” |
| Field Keys |
|---|
| “young” , “adult” |
If we query our data with:
from(bucket: "cats-and-dogs")
  |> range(start: 2020-05-15T00:00:00Z, stop: 2020-05-16T00:00:00Z)
  |> filter(fn: (r) => r["_measurement"] == "cats")
  |> filter(fn: (r) => r["_field"] == "adult")
  |> filter(fn: (r) => r["shelter"] == "A")
  |> filter(fn: (r) => r["type"] == "calico")
  |> limit(n:2)Copy
This is what our Annotated CSV result looks like:
#group,false,false,true,true,false,false,true,true,true,true
#datatype,string,long,dateTime:RFC3339,dateTime:RFC3339,dateTime:RFC3339,double,string,string,string,string
#default,_result,,,,,,,,,
,result,table,_start,_stop,_time,_value,_field,_measurement,shelter,type
,,0,2020-05-15T00:00:00Z,2020-05-16T00:00:00Z,2020-05-15T18:50:33.262484Z,8,adult,cats,A,calico
,,0,2020-05-15T00:00:00Z,2020-05-16T00:00:00Z,2020-05-15T18:51:48.852085Z,7,adult,cats,A,calico
The Annotated CSV has three Annotations. The Annotation rows describe column properties and start with a #.
#group: A boolean that indicates the column is part of the group key. A group key is a list of columns for which every row in the table has the same value. Let’s look at the difference between the true and false columns, or the columns that are and aren’t part of the group key, respectively.- true columns: In our example query above, we’ve filtered by a single field type, adult, a single “shelter” tag, “A”, and a single “type” tag, “calico”. These values are constant across rows, so those columns are set to true. Also, filtering for a single value across tags and fields means that all of our tables will belong to the same table. Therefore the table column is also true for this query. The _start and _stop columns, defined by our range, are constants across the rows so these values are also true.
- false columns: The _time and _value columns have different values values across rows which is why they receive a false for the value of the #group Annotation.
#datatype: Describes the type of data or which line protocol element the column represents.#default: The value to use for rows with an empty value. So for example, if we had assigned our query to the variable ourQuery this annotation would look like:#default,ourQuery,,,,,,,,,
IoT Center: introduction
 (The IoT Center application)
The Iot Center application manages IoT devices that write data into InfluxDB. IoT Center shows connected devices and measured values from InfluxDB in custom dashboards. It is designed to demonstrate one possible application architecture for a web app using InfluxDB and IoT clients.
Each IoT device measures temperature. Depending on the connected sensors, it can provide additional measurements like humidity, pressure, and CO2 concentration. Each device can either provide static GPS coordinates or actual coordinates from a connected GPS module.
Reading the source code
The IoT Center is designed for demonstration purposes with this guide in mind. To improve readability of the source code, features are developed in separate files with minimum sharing among the components. While a production application would be structured differently, the IoT Center can be used to inspire further development.
The project also includes source code for IoT devices based on Arduino (ESP8266/32) and Raspberry Pi with Python. We will cover device code in later chapters.
Run the IoT Center
Before running the application (the server and web interface), install InfluxDB 2.0.0+. Download the version matching your OS and architecture from the InfluxData downloads page. Configure your username, organization, and token.
For detailed instructions, see Get started with InfluxDB.
Then, clone the IoT Center repository.
git clone https://github.com/bonitoo-io/iot-center-v2.git
cd iot-center-v2
git checkout d93d7d963f23059ce53ac4a3813a1f822f257ba5
Next, install the requirements:
InfluxDB must be running when the IoT Center starts. Start the InfluxDB server by running:
influxd
Configure your environment variables so that IoT Center can communicate with InfluxDB:
export INFLUX_TOKEN=<mysecrettoken>
export INFLUX_ORG=<myorg>
export INFLUX_BUCKET= iot_center # this is set by IoT center by default
export INFLUX_URL= http://localhost:8086 # this is set by IoT center by default
Finally, run the application:
cd iot-center-/app/
yarn install
yarn build
yarn start
open http://localhost:5000
For more, see the IoT Center README page.
Create the back end: A tale of two APIs
There will be two APIs at the core of the IoT center.
The InfluxDB API is served by the influxd process (at localhost:8086, by default).
We need to write code to interact with it.
The influxdb-client-js JavaScript library will handle much of the communication with the InfluxDB API.
The IoT Center API will provide functionality for managing devices. We will write the IoT Center API ourselves. To do this we'll use Node.js and Express.js to provide HTTP paths for registering devices and other functions.
In the following sections, we will create the server that interacts with these two back end APIs. In addition to helping understand the architecture of the IoT Center’s interactions with data and devices, coding these APIs will help us understood the UI, and how we might extend it.
Requirements
Before continuing, be sure to have the following installed:
Set up and configure InfluxDB
In order to communicate with InfluxDB, the IoT Center application needs some basic information. The application must then be able to enforce the state of the InfluxDB configuration so that devices can reliably send API requests.
The InfluxDB specific parts of the IoT Center’s own API are in app/server/influxdb/.
These contain functions for the onboarding process, authorizations, and organizations.
We’ll place InfluxDB API functionality in this influxdb/ directory as we go.
The code we’ll look at below contains helper functions for configuration that will be used in the Express routes, which serve and handle the paths of the HTTP API.
As we build the server, we’ll link to locations in final code so you can see how it all comes together.
Create the project
To begin, create a new folder in your home directory:
mkdir $HOME/iot-center-app/
Within iot-center-app/, create a directory for our back-end code:
cd iot-center-app/
mkdir server
Configure InfluxDB with environment variables
We configure the application’s communication with InfluxDB by environment variables.
Open a text editor and save the following code as env.js in the iot-center-app/app/server/ directory.
When the server starts, the following code will run to retrieve environment variables:
const INFLUX_URL = process.env.INFLUX_URL || 'http://localhost:8086'
const INFLUX_TOKEN = process.env.INFLUX_TOKEN || 'my-token'
const INFLUX_ORG = process.env.INFLUX_ORG || 'my-org'
const INFLUX_BUCKET = 'iot_center'

// Defaults when on boarding a fresh new InfluxDB instance
const onboarding_username = 'my-user' // InfluxDB user
const onboarding_password = 'my-password' // InfluxDB password

// recommended interval for clients to refresh configuration in seconds
const configuration_refresh = 3600
Let’s take these environment variables in turn:
- The application server will us the
INFLUX_TOKENvalue to authenticate its requests to the InfluxDB API. This should be an all-access token. This is the server’s “master token” (so to speak) and should only be used by the IoT Center server. INFLUX_URLtells the application where the InfluxDB server is located. By default, the server will look for a local installation of InfluxDB athttp://localhost:8086.1INFLUX_ORGis the name of the organization for the IoT Center to use.INFLUX_BUCKETis the name of the bucket to which devices will write data.
With the configuration data now available, let’s add some basic logging to display them when the server starts:
// --snip--

function logEnvironment() {
  console.log(`INFLUX_URL=${INFLUX_URL}`)
  console.log(`INFLUX_TOKEN=${INFLUX_TOKEN ? '***' : ''}`)
  console.log(`INFLUX_ORG=${INFLUX_ORG}`)
  console.log(`INFLUX_BUCKET=${INFLUX_BUCKET}`)
}
Finally we need to export the variables so that they can be used elsewhere:
// --snip--

module.exports = {
  INFLUX_URL,
  INFLUX_TOKEN,
  INFLUX_ORG,
  onboarding_username,
  onboarding_password,
  configuration_refresh,
  INFLUX_BUCKET,
  logEnvironment,
}
Create server entrypoint file
From the server directory, let’s now create a file call index.js.
This file will be responsible for starting the server.
We should now have a directory structure like this:
.
└── app
    └── server
        ├── env.js
        └── index.js
First, we will import INFLUX_URL from the environment variables we defined in env.js
We will also import the Express web framework we'll be using to run the server.
Paste the following into server/index.js:
const {logEnvironment, INFLUX_URL} = require('./env')
const express = require('express')
const proxy = require('express-http-proxy')
// --snip--

async function startApplication() {
  const app = express()

  // start proxy to InfluxDB to avoid CORS blocking with InfluXDB OSS v2 Beta
  app.use('/influx', proxy(INFLUX_URL))
  console.log(`Enable proxy from /influx/* to ${INFLUX_URL}/*`)

  // start HTTP server
  const port = process.env.PORT || 5000
  app.listen(port, process.env.HOSTNAME || '0.0.0.0')

  logEnvironment()
  console.log(`Listening on http://localhost:${port}`)
}
// --snip--

startApplication().catch((e) => {
  console.error('Failed to start', e)
})
Install Node dependencies and test run the server
Install the Node dependencies.
From server/ directory, do:
yarn add express express-http-proxy
Let's test what we've written so far:
cd iot-center-app/app/server/
node index.js
You should see this output:
$ node index.js
Enable proxy from /influx/* to http://localhost:8086/*
INFLUX_URL=http://localhost:8086
INFLUX_TOKEN=***
INFLUX_ORG=my-org
INFLUX_BUCKET=iot_center
Listening on http://localhost:5000
Later, you might want to pass a URL for InfluxDB Cloud or another address on the local network.
InfluxDB API: Onboarding
We use the InfluxDB API via the InfluxDB Javascript client library.
Organize InfluxDB functionality in app/server/influxdb/
When our IoT Center server starts, it should try to connect to InfluxDB. We want to use the InfluxDB API to check that the database is connected, and that the target bucket is present and accessible. If IoT Center doesn’t find those things, it should set up InfluxDB and create the necessary buckets.
Create an onboarding.js file at server/influxdb/onboarding.js.
mkdir influxdb
touch influxdb/onboarding.js
We will place much more code in this directory going forward. For now, we focus on onboarding.
Onboard InfluxDB
First we import the InfluxDB setup API from the client library client.
Then, import the configuration variables from env.js.
const {InfluxDB, HttpError} = require('@influxdata/influxdb-client')
const {SetupAPI} = require('@influxdata/influxdb-client-apis')
const {
  INFLUX_URL,
  INFLUX_TOKEN,
  INFLUX_ORG,
  onboarding_username,
  onboarding_password,
  INFLUX_BUCKET,
} = require('../env')
Create the onboardInfluxDB function in onboarding.js.
Paste the following:
async function onboardInfluxDB() {
  const url = INFLUX_URL
  const setupApi = new SetupAPI(new InfluxDB({url}))
}
We need the URL of InfluxDB, so we can talk to its API server.
In this line we create a SetupAPI object.
We use getSetup() to check whether InfluxDB has been onboarded,
and the postSetup() method to do the setup (by POSTing a
request to the InfluxDB API).
async function onboardInfluxDB() {
    const url = INFLUX_URL
    const setupApi = new SetupAPI(new InfluxDB({url}))
    const {allowed} = await setupApi.getSetup()
    if (allowed) {
        await setupApi.postSetup({
            body: {
                org: INFLUX_ORG,
                bucket: INFLUX_BUCKET,
                username: onboarding_username,
                password: onboarding_password,
                token: INFLUX_TOKEN,
            },
        })
        console.log(`InfluxDB has been onboarded.`)
    }
    console.log(`InfluxDB was not onboarded.`)
}
The complete onboarding function
Here is the full onboardInfluxDB function:
async function onboardInfluxDB() {
  const url = INFLUX_URL
  const setupApi = new SetupAPI(new InfluxDB({url}))
  try {
    const {allowed} = await setupApi.getSetup()
    if (allowed) {
      await setupApi.postSetup({
        body: {
          org: INFLUX_ORG,
          bucket: INFLUX_BUCKET,
          username: onboarding_username,
          password: onboarding_password,
          token: INFLUX_TOKEN,
        },
      })
      console.log(`InfluxDB has been onboarded.`)
    }
    let bucketNotFound = false
    try {
      await getBucket(INFLUX_BUCKET)
      console.log(`Bucket '${INFLUX_BUCKET}' exists.`)
    } catch (e) {
      if (e instanceof HttpError && e.statusCode === 401) {
        console.error(
          `Unauthorized to determine whether a bucket '${INFLUX_BUCKET}' exists.`
        )
      } else if (e instanceof HttpError && e.statusCode === 404) {
        // bucket not found
        bucketNotFound = true
      } else {
        console.error(
          `Unable to check whether a bucket '${INFLUX_BUCKET}' exists.`,
          e
        )
      }
    }
    if (bucketNotFound) {
      await createBucket(INFLUX_BUCKET)
      console.log(`Bucket ${INFLUX_BUCKET} created.`)
    }
  } catch (error) {
    console.error(
      `Unable to determine whether InfluxDB at ${INFLUX_URL} is onboarded.`,
      error
    )
  }
}
Bucket creation
This snippet creates a bucket if bucketNotFound is true:
if (bucketNotFound) {
  await createBucket(INFLUX_BUCKET)
  console.log(`Bucket ${INFLUX_BUCKET} created.`)
}
createBucket()
is another function that we will define in the server/influxdb/ directory.
Conclusion
Next, we start creating our API for managing devices.
Register and authorize devices
Before the IoT Center allows a device to communicate with its server or InfluxDB, it must validate the device’s configuration and distribute credentials in the form of a token.
In the context of the IoT Center, a device being registered is meant to be coupled with the permissions model of InfluxDB. A device is registered if it is in the database and has been issued credentials.
InfluxDB 2 requires authentication by default. Each request to the API must provide a properly-scoped token. For instance, a write request must provide a token that has write permissions to the particular bucket.
The IoT Center automatically creates an authorization token for every device using the InfluxDB authorizations API. A device, identified by a unique deviceId, uses HTTP GET to receive a InfluxDB URL, organization, bucket, and token. The device uses this information to start writing data to InfluxDB.
The code used by IoT Center to interact with the InfluxDB authorization API is in
app/server/influxdb/authorizations.js.
Importing the InfluxDB authorizations API
The file that defines the authorization-related parts of the IoT Center API begins with several import statements. The first import brings in the InfluxDB authorizations API.
const {AuthorizationsAPI} = require('@influxdata/influxdb-client-apis')
const influxdb = require('./influxdb')
const {getOrganization} = require('./organizations')
const {getBucket} = require('./buckets')
const {INFLUX_BUCKET} = require('../env')

const authorizationsAPI = new AuthorizationsAPI(influxdb)
const DESC_PREFIX = 'IoT Center: '
const CREATE_BUCKET_SPECIFIC_AUTHORIZATIONS = false
const influxdb refers to the InfluxDB object.
The influxdb object is passed to new AuthorizationsAPI(influxdb) to get an authorizationsAPI.
The Authorization type is an important structure. It contains the permissions information for reading and writing to InfluxDB. These data are passed as an array of Permissions.
Define device functions with the InfluxDB API
In this section we write functions for creating authorizations, getting various data about devices, deleting authorizations, and checking permissions.
Create an authorization for a device
This function creates an authorization for a device, given an ID. It returns a promise with an authorization or an error.
async function createIoTAuthorization(deviceId) {
  const {id: orgID} = await getOrganization()
  let bucketID = undefined
  if (CREATE_BUCKET_SPECIFIC_AUTHORIZATIONS) {
    bucketID = await getBucket(INFLUX_BUCKET).id
  }
  console.log(
    `createIoTAuthorization: deviceId=${deviceId} orgID=${orgID} bucketID=${bucketID}`
  )
  return await authorizationsAPI.postAuthorizations({
    body: {
      orgID,
      description: DESC_PREFIX + deviceId,
      permissions: [
        {
          action: 'read',
          resource: {type: 'buckets', id: bucketID, orgID},
        },
        {
          action: 'write',
          resource: {type: 'buckets', id: bucketID, orgID},
        },
      ],
    },
  })
}
This function is a good example of the interaction between the IoTCenter API, represented by HTTP paths, and the InfluxDB API, wrapped in the JavaScript client library
(See https://influxdata.github.io/influxdb-client-js/influxdb-client-apis.authorizationsapi.postauthorizations.html .)
The createIoTAuthorization function is called by the /env/:deviceid API path.
(We discuss REST HTTP paths in the next section.)
Get information about authorizations
Gets IoT Center device authorization.
async function getIoTAuthorization(deviceId) {
  const authorizations = await getAuthorizations()
  const descriptionPrefix = DESC_PREFIX + deviceId
  const {id: bucketId} = await getBucket()
  const retVal = authorizations.reduce((acc, val) => {
    if (val.description.startsWith(descriptionPrefix)) {
      // does the authorization allow access to the bucket
      if (!isBucketRWAuthorized(val, bucketId)) {
        return acc // this grant does not allow R/W to the bucket
      }
      // if there are more tokens, use the one that was lastly updated
      if (!acc || String(val.updatedAt) > String(acc.updatedAt)) {
        return val
      }
    }
    return acc
  }, undefined)
  // console.log('getIoTAuthorization: ', retVal ? retVal.description : undefined)
  return retVal
}
This calls: getAuthorizations.
Let’s look at the definition of getAuthorizations:
async function getAuthorizations() {
  const {id: orgID} = await getOrganization()
  const authorizations = await authorizationsAPI.getAuthorizations({orgID})
  return authorizations.authorizations || []
}
The functions gets all authorizations, returning (a promise with) an array of authorizations.
It does this with the InfluxDB client library: authorizationsAPI.getAuthorizations.
getDeviceId is another helper function that returns a device ID from a given Authorization object.
function getDeviceId(authorization) {
  const description = String(authorization.description)
  if (description.startsWith(DESC_PREFIX)) {
    return description.substring(DESC_PREFIX.length)
  }
  return description
}
This is called here.
so that getIoTAuthorization can have a deviceID to pass.
Check authorization permissions
The getIoTAuthorization function above also calls isBucketRWAuthorized.
This is an important helper function in the authorization code.
isBucketRWAuthorized checks if the supplied authorization has permissions to read and write to the INFLUX_BUCKET.
If it can, this returns true.
function isBucketRWAuthorized(authorization, bucketId) {
  const bucketRW = authorization.permissions.reduce((acc, val) => {
    if (
      val.resource.type === 'buckets' &&
      (!val.resource.id || val.resource.id === bucketId)
    ) {
      return acc | (val.action === 'read' ? 1 : 2)
    }
    return acc
  }, 0)
  return bucketRW === 3
}
Delete an authorization
Finally, we need a way to delete authorizations. Deletes authorization for a supplied InfluxDB key (the ID of the authorization).
async function deleteAuthorization(key) {
  return authorizationsAPI.deleteAuthorizationsID({authID: key})
}
Called here.
Serve the API
With our back end functionality defined, it’s time to actually serve the API.
The code in apis/index.js defines the REST HTTP endpoints for the IoT Center API.
Express.js routing1 is used in conjunction with the helper functions documented above.
In the following import statements,
functions imported from authorizations.js, and env.js (covered above):
const env = require('../env')
// const {stringify} = require('yaml')
const {
  getIoTAuthorization,
  createIoTAuthorization,
  getIoTAuthorizations,
  getDeviceId,
  deleteAuthorization,
} = require('../influxdb/authorizations')
We also need to import the Router() method from Express, in order to serve the REST API.
Do this by adding:
const express = require('express')
const router = express.Router()
API paths
Express handles HTTP verbs and paths.
We need our server to:
- register new devices
- return information about current devices
- list all register devices
- delete device registrations
We can accomplish this using three API endpoints:
a GET /env/:deviceId,
a GET /devices;
DELETE /devices/:deviceId
Describe or register device
GET /env/:deviceId
Return environment for a specific device by its ID.
This will either run createIoTAuthorization if none exists, or getIoTAuthorization.
It also handles registration.
router.get(
  '/env/:deviceId',
  handleError(async (req, res) => {
    const deviceId = req.params.deviceId
    let authorization = await getIoTAuthorization(deviceId)
    let registered = false
    if (!authorization) {
      if (req.query.register !== 'false') {
        authorization = await createIoTAuthorization(deviceId)
        registered = true
      } else {
        res.status(403)
        return res.json({
          id: deviceId,
          registered,
        })
      }
    }
    [*snip*]
  })
)
This creates an authorization if it doesn’t exist:
if (req.query.register !== 'false') {
  authorization = await createIoTAuthorization(deviceId)
  registered = true
List devices
GET /devices
Gets a list of registered devices used in web UI to provide a list devices.
It contains deviceId.
router.get(
  '/devices',
  handleError(async (_req, res) => {
    const authorizations = await getIoTAuthorizations()
    res.json(
      authorizations.map((a) => ({
        key: a.id,
        deviceId: getDeviceId(a),
        createdAt: a.createdAt,
      }))
    )
  })
)
Delete device
DELETE /devices/:deviceId
Remove a device identified by device_id.
It also deletes the associated authorization token from InfluxDB.
router.delete(
  '/devices/:deviceId',
  handleError(async (req, res) => {
    const deviceId = req.params.deviceId
    const authorizations = await getIoTAuthorizations()
    for (const a of authorizations) {
      if (getDeviceId(a) === deviceId) {
        await deleteAuthorization(a.id)
        res.status(204)
        res.send('Device authorization removed')
        return
      }
    }
    res.status(404)
    res.send(`Device ${deviceId} not found!`)
  })
)
For more information on routing in Express, see Basic routing and Routing
Front end: create a UI
Now that we’ve created the IoT Center’s back-end server and APIs, let’s create a web application that uses the APIs and (other functionality provided by the Flux language) to interact with time series data. In the UI, users will be able to visualize data, manage devices, and write test data to InfluxDB.
In the next sections, we will look at the code behind the the IoT Center user interface. The UI runs in the browser and has four pages:
- Home1
- Device Registration
- Virtual Device
- Dashboard
On each page, we'll write code to:
- managing device configurations
- the IoT Center API from the UI’s point of view
- the InfluxDB REST API for writing and querying data
- the Flux query langauge
We can skip the Home page since it doesn’t use any special InfluxDB related code, or call the IoT Center API. Here is its source, if you’re interested.
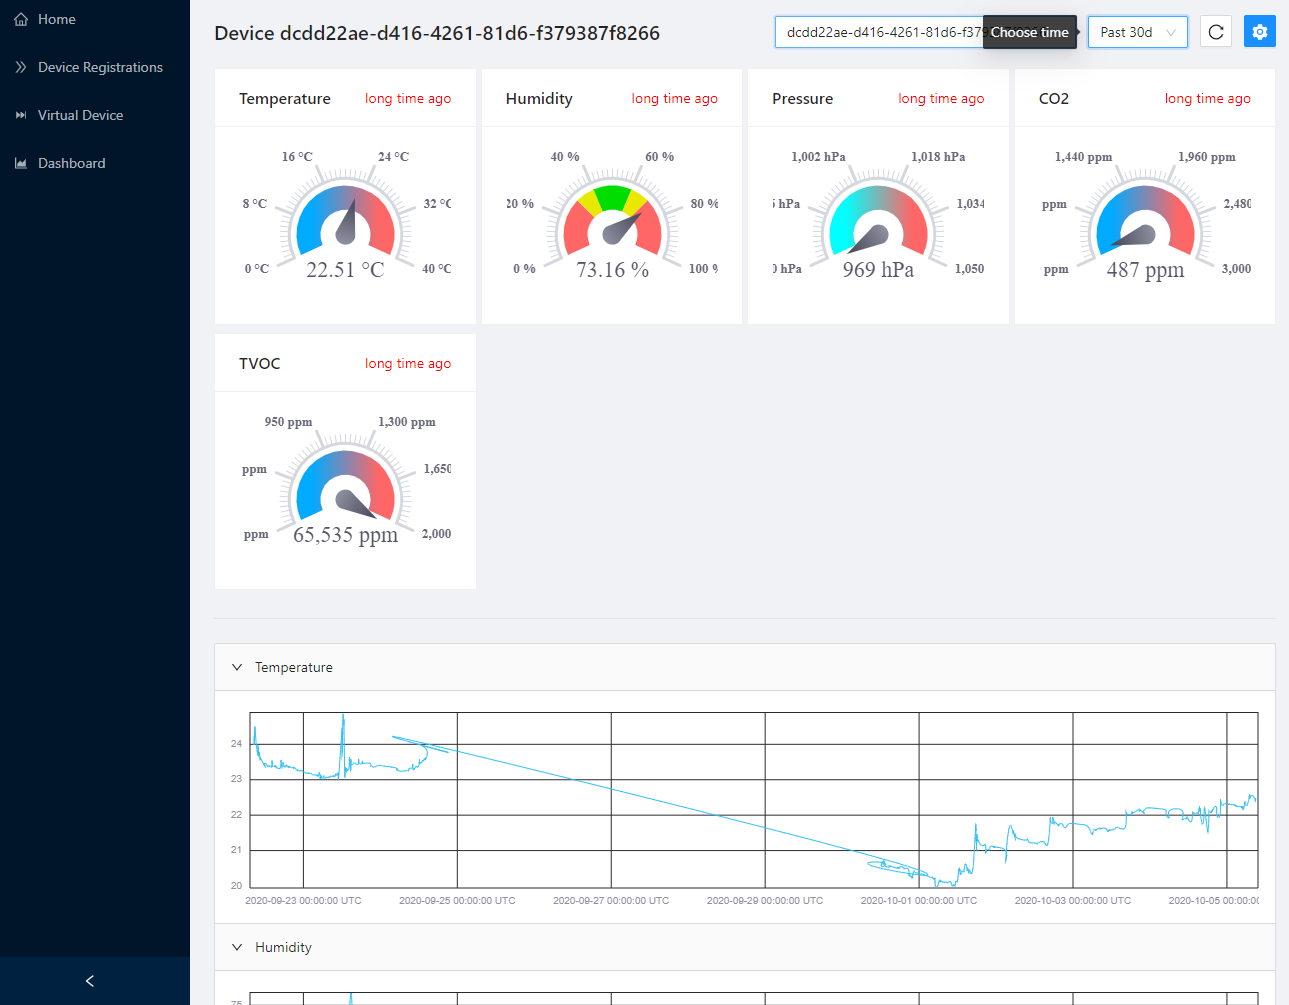
Dashboard: visualizing data
View the source code for this file.
This page shows the Dashboard view of the IoT Center. Each visual element represents a device.
It has a dropdown menu to select time range, as well as buttons to refresh the view and change settings. It can filter and display a time graph.
Getting started
The dashboard uses queries to the InfluxDB API to populate data.
We want descibe the essential data and functions of working with a time series database. We also need to import the libraries with this functionality built in for the InfluxDB API. Code like this is in each of the files.
InfluxDB client libraries
The InfluxDB client libraries provide language-specific ways to interact with the InfluxDB API. These can aid greatly in development. Sometimes, however, you might want to use a language’s own libraries to send raw HTTP requests (e.g. on an embedded or low-powered device).
Device configuration
We define an interface for device configurations.
The elements of the interface correspong to the concepts described in Key concepts above.
interface DeviceConfig {
  influx_url: string
  influx_org: string
  influx_token: string
  influx_bucket: string
  id: string
}
Imports
import PageContent, {Message} from './PageContent'
import {
  Plot,
  timeFormatter,
  Table as GiraffeTable,
  GAUGE_THEME_LIGHT,
  GaugeLayerConfig,
  LineLayerConfig,
} from '@influxdata/giraffe'
import {
  SettingFilled,
  ReloadOutlined,
  InfoCircleFilled,
} from '@ant-design/icons'
import CollapsePanel from 'antd/lib/collapse/CollapsePanel'
import {DeviceInfo} from './DevicesPage'
import {getXDomainFromTable} from '../util/tableUtils'
import {flux, fluxDuration, InfluxDB} from '@influxdata/influxdb-client'
import {queryTable} from '../util/queryTable'
import {VIRTUAL_DEVICE} from '../App'
Fetch Measurements
+ +
The fetchDeviceMeasurements function contains a Flux script to query InfluxDB.
It uses Flux’s fieldsAsCols() function,
and fluxDuration() imported from the InfluxDB JS library.
const fetchDeviceMeasurements = async (
  config: DeviceConfig,
  timeStart = '-30d'
): Promise<GiraffeTable> => {
  const {
    // influx_url: url, // use '/influx' proxy to avoid problem with InfluxDB v2 Beta (Docker)
    influx_token: token,
    influx_org: org,
    influx_bucket: bucket,
    id,
  } = config
  const queryApi = new InfluxDB({url: '/influx', token}).getQueryApi(org)
  const result = await queryTable(
    queryApi,
    flux`
  import "influxdata/influxdb/v1"
  from(bucket: ${bucket})
    |> range(start: ${fluxDuration(timeStart)})
    |> filter(fn: (r) => r._measurement == "environment")
    |> filter(fn: (r) => r.clientId == ${id})
    |> v1.fieldsAsCols()`
  )
  return result
}
Device Registrations: managing devices
 (The Device Registrations page, showing the Register and Remove Device buttons.)
View the source code for this file.
The code for the Device Registration page contains some similar code to the Dashboard. We do some imports, define a device configuration, and fetch that configuration.
On this page, we start exposing functionality that performs calls to the IoT Center server itself.
DevicesPage
A lot happens in this block, which makes up most of the file. The block includes definitions of functions to add and remove authorizations, and code that creates and populates elements of the UI.
const DevicesPage: FunctionComponent<Props> = ({helpCollapsed}) => {
    // Some setup happens here.
    // useEffect(() => {...}
    const removeAuthorization {...}
    const addAuthorization  {...}
    // Define table columns.
    // Return page content.
 }
(Source) This code has been condensed.
One piece of data needed is the registration time of each device. This uses a Flux query.
fetchLastEntryTime
const fetchLastEntryTime = async (deviceId: string): Promise<LastEntryTime> => {
  const config = await fetchDeviceConfig(deviceId)
  const {
    // influx_url: url, // use '/influx' proxy to avoid problem with InfluxDB v2 Beta (Docker)
    influx_token: token,
    influx_org: org,
    influx_bucket: bucket,
    id,
  } = config
  const queryApi = new InfluxDB({url: '/influx', token}).getQueryApi(org)
  const result = await queryTable(
    queryApi,
    flux`
  import "influxdata/influxdb/v1"
  from(bucket: ${bucket})
    |> range(start: -1y)
    |> filter(fn: (r) => r.clientId == ${id})
    |> filter(fn: (r) => r._measurement == "environment")
    |> keep(columns: ["_time"])
    |> max(column: "_time")
    `
  )
  const lastColumn = result.getColumn('_time')
  if (lastColumn !== null) {
    const [lastEntry] = lastColumn as number[]
    return {lastEntry, deviceId}
  }
  return {deviceId}
}
Let’s examine the Flux query called into the code above.
It uses the
range(),
filter(),
keep(), and
max() functions.
import "influxdata/influxdb/v1"
from(bucket: ${bucket})
  |> range(start: -1y)
  |> filter(fn: (r) => r.clientId == ${id})
  |> filter(fn: (r) => r._measurement == "environment")
  |> keep(columns: ["_time"])
  |> max(column: "_time")
Buttons: register and remove devices
Here we focus on the functionality provided in the browser UI for the IoT Center. The following code registers a new device from the UI button and form.
Register a device
  const addAuthorization = async (deviceId: string) => {
    try {
      setLoading(true)
      const response = await fetch(`/api/env/${deviceId}`)
      if (response.status >= 300) {
        const text = await response.text()
        throw new Error(`${response.status} ${text}`)
      }
      const {newlyRegistered} = await response.json()

      setLoading(false)
      if (newlyRegistered) {
        antdMessage.success(`Device '${deviceId}' was registered`, 2)
      } else {
        antdMessage.success(`Device '${deviceId}' is already registered`, 2)
      }
    } catch (e) {
      setLoading(false)
      setMessage({
        title: 'Cannot register device',
        description: String(e),
        type: 'error',
      })
    } finally {
      setDataStamp(dataStamp + 1)
    }
  }
The fourth line here /api/env/${deviceId} calls to an API endpoint we’ll look at in Chapter 6.
Remove Device
Once a device is registered, it appears on the page.
Clicking on the Remove Device button will send an API call via an HTTP DELETE request to /api/devices/<deviceID>.
The function responsible for this is removeAuthorization:
  const removeAuthorization = async (device: DeviceInfo) => {
    try {
      setLoading(true)
      const response = await fetch(`/api/devices/${device.deviceId}`, {
        method: 'DELETE',
      })
      if (response.status >= 300) {
        const text = await response.text()
        throw new Error(`${response.status} ${text}`)
      }
      setLoading(false)
      antdMessage.success(`Device ${device.deviceId} was unregistered`, 2)
    } catch (e) {
      setLoading(false)
      setMessage({
        title: 'Cannot remove device',
        description: String(e),
        type: 'error',
      })
    } finally {
      setDataStamp(dataStamp + 1)
    }
  }
Page code: building the page
Defining the devices table
The table sorts devices by DeviceID and Registration Time.
  // define table columns
  const columnDefinitions: ColumnsType<DeviceInfo> = [
    {
      title: 'Device ID',
      dataIndex: 'deviceId',
      defaultSortOrder: 'ascend',
      render: (deviceId: string) => (
        <Link to={`/devices/${deviceId}`}>{deviceId}</Link>
      ),
      sorter: (a: DeviceInfo, b: DeviceInfo) =>
        a.deviceId > b.deviceId ? 1 : -1,
    },
    {
      title: 'Registration Time',
      dataIndex: 'createdAt',
      responsive: helpLayout(['lg'], ['xxl']),
    },
    {
      title: 'Last Entry',
      dataIndex: 'deviceId',
      render: (id: string) => {
        const lastEntry = lastEntries.find(({deviceId}) => deviceId === id)
          ?.lastEntry
        if (lastEntry != null && lastEntry !== 0)
          return timeFormatter({
            timeZone: 'UTC',
            format: 'YYYY-MM-DD HH:mm:ss ZZ',
          })(lastEntry)
      },
      responsive: helpLayout(['xl'], []),
    },
    {
      title: '',
      key: 'action',
      align: 'right',
      render: (_: string, device: DeviceInfo) => (
        <>
          <Tooltip title="Go to device settings" placement="topRight">
            <Button
              icon={<SettingFilled />}
              href={`/devices/${device.deviceId}`}
            />
          </Tooltip>
          <Tooltip title="Go to device dashboard" placement="topRight">
            <Button
              icon={<AreaChartOutlined />}
              href={`/dashboard/${device.deviceId}`}
            />
          </Tooltip>
          <Popconfirm
            icon={<ExclamationCircleFilled style={{color: 'red'}} />}
            title={`Are you sure to remove '${device.deviceId}' ?`}
            onConfirm={() => removeAuthorization(device)}
            okText="Yes"
            okType="danger"
            cancelText="No"
          >
            <Tooltip title="Remove device" placement="topRight" color="red">
              <Button type="default" icon={<DeleteFilled />} danger />
            </Tooltip>
          </Popconfirm>
        </>
      ),
    },
  ]
Returning page content
  return (
    <PageContent
      title="Device Registrations"
      spin={loading}
      message={message}
      titleExtra={
        <>
          <Tooltip title="Register a new Device">
            <Button
              type="dashed"
              onClick={() => {
                let deviceId = ''
                Modal.confirm({
                  title: 'Register Device',
                  icon: '',
                  content: (
                    <Form name="registerDevice" initialValues={{deviceId}}>
                      <Form.Item
                        name="deviceId"
                        rules={[
                          {required: true, message: 'Please input device ID !'},
                        ]}
                      >
                        <Input
                          placeholder="Device ID"
                          onChange={(e) => (deviceId = e.target.value)}
                        />
                      </Form.Item>
                    </Form>
                  ),
                  onOk: () => {
                    addAuthorization(deviceId)
                  },
                  okText: 'Register',
                })
              }}
            >
              Register
            </Button>
          </Tooltip>
          <Tooltip title="Reload Table">
            <Button
              type="primary"
              onClick={() => setDataStamp(dataStamp + 1)}
              style={{marginRight: '8px'}}
            >
              Reload
            </Button>
          </Tooltip>
        </>
      }
    >
      <Table dataSource={data} columns={columnDefinitions}></Table>
    </PageContent>
  )
}
Virtual Device: writing data
View the source code for this file.
The virtual device emulates a real device, generating examples data so that we can use IoT Center without needing a real device. It writes measurements for every minute in the last 30 days. It can also generate and send temperature, humidity, pressure, CO2, TVOC, latitude, and longitude measurements.
The “device” is a piece of code that runs in the browser. It uses the influxdb-client-js library. It gets the configuration of how to communicate with InfluxDB (URL, organization, bucket, token) from IoT center. It behaves the same way as a any other device. It receives the last the time of the reported measurement, so that only missing measurements are written to InfluxDB.
The code for the virtual device page contains some similar code to the dashboard and device registration page. We do some imports. Again we define a device configuration and fetch that configuration.
fetchDeviceData
The following code contains Flux source code.
async function fetchDeviceData(config: DeviceConfig): Promise<DeviceData> {
  const {
    // influx_url: url, // use '/influx' proxy to avoid problem with InfluxDB v2 Beta (Docker)
    influx_token: token,
    influx_org: org,
    influx_bucket: bucket,
    id,
  } = config
  const influxDB = new InfluxDB({url: '/influx', token})
  const queryApi = influxDB.getQueryApi(org)
  const measurements = await queryApi.collectRows<any>(flux`
  import "math"
from(bucket: ${bucket})
  |> range(start: -30d)
  |> filter(fn: (r) => r._measurement == "environment")
  |> filter(fn: (r) => r.clientId == ${id})
  |> toFloat()
  |> group(columns: ["_field"])
  |> reduce(
      fn: (r, accumulator) => ({
        maxTime: (if r._time>accumulator.maxTime then r._time else accumulator.maxTime),
        maxValue: (if r._value>accumulator.maxValue then r._value else accumulator.maxValue),
        minValue: (if r._value<accumulator.minValue then r._value else accumulator.minValue),
        count: accumulator.count + 1.0
      }),
      identity: {maxTime: 1970-01-01, count: 0.0, minValue: math.mInf(sign: 1), maxValue: math.mInf(sign: -1)}
  )`)
  return {config, measurements}
}
math module.
toFloat(),
group(),
reduce(),
accumulator().
import "math"
from(bucket: ${bucket})
  |> range(start: -30d)
  |> filter(fn: (r) => r._measurement == "environment")
  |> filter(fn: (r) => r.clientId == ${id})
  |> toFloat()
  |> group(columns: ["_field"])
  |> reduce(
      fn: (r, accumulator) => ({
        maxTime: (if r._time>accumulator.maxTime then r._time else accumulator.maxTime),
        maxValue: (if r._value>accumulator.maxValue then r._value else accumulator.maxValue),
        minValue: (if r._value<accumulator.minValue then r._value else accumulator.minValue),
        count: accumulator.count + 1.0
      }),
      identity: {maxTime: 1970-01-01, count: 0.0, minValue: math.mInf(sign: 1), maxValue: math.mInf(sign: -1)}
  )
writeEmulatedData
When you click the Write New Data button, the writeEmulatedData function is called.
This function informs about the count/percentage of written measurements,
so that the UI can display a progress bar and a count of written measurement points.
async function writeEmulatedData(
  state: DeviceData,
  onProgress: ProgressFn
): Promise<number> {
  const {
    // influx_url: url, // use '/influx' proxy to avoid problems with InfluxDB v2 Beta (Docker)
    influx_token: token,
    influx_org: org,
    influx_bucket: bucket,
    id,
  } = state.config
  // calculate window to emulate writes
  const toTime = Math.trunc(Date.now() / 60_000) * 60_000
  let lastTime = state.measurements[0]?.maxTime
    ? Math.trunc(Date.parse(state.measurements[0].maxTime) / 60_000) * 60_000
    : 0
  if (lastTime < toTime - 30 * 24 * 60 * 60 * 1000) {
    lastTime = toTime - 30 * 24 * 60 * 60 * 1000
  }
  const totalPoints = Math.trunc((toTime - lastTime) / 60_000)
  let pointsWritten = 0
  if (totalPoints > 0) {
    const batchSize = 2000
    const influxDB = new InfluxDB({url: '/influx', token})
    const writeApi = influxDB.getWriteApi(org, bucket, 'ms', {
      batchSize: batchSize + 1,
      defaultTags: {clientId: id},
    })
    try {
      // write random temperatures
      const point = new Point('environment') // reuse the same point to spare memory
      onProgress(0, 0, totalPoints)
      while (lastTime < toTime) {
        lastTime += 60_000 // emulate next minute
        point
          .floatField('Temperature', generateTemperature(lastTime))
          .floatField('Humidity', generateHumidity(lastTime))
          .floatField('Pressure', generatePressure(lastTime))
          .intField('CO2', generateCO2(lastTime))
          .intField('TVOC', generateTVOC(lastTime))
          .floatField('Lat', state.config.default_lat || 50.0873254)
          .floatField('Lon', state.config.default_lon || 14.4071543)
          .timestamp(lastTime)
        writeApi.writePoint(point)

        pointsWritten++
        if (pointsWritten % batchSize === 0) {
          await writeApi.flush()
          onProgress(
            (pointsWritten / totalPoints) * 100,
            pointsWritten,
            totalPoints
          )
        }
      }
      await writeApi.flush()
    } finally {
      await writeApi.close()
    }
    onProgress(100, pointsWritten, totalPoints)
  }

  return pointsWritten
}
Devices
The IoT Center repository contains example code to run on the device side: an Arduino client and a Raspberry Pi client.
This section also contains information on specific hardware.
Raspberry Pi Python client
Source code for Python client.
Based on the InfluxDB client library for Python.
Accessing the sensors
Data comes from bme280 sensor connected to I2C bus. Based on library https://gitlab.com/Kampi/bmp-sensors.
We define a Sensor class with three methods: __init__, measure, and geo.
class Sensor:
    """Sensor to provide information about Temperature, Humidity, Pressure, ..."""
    def __init__(self):
        # ...
    def measure(self):
        # ...
    def geo(self):
        # ...
Managing device configuration
def configure() -> None:
    """
    Retrieve or refresh a configuration from IoT Center.

    Successful configuration is set as a global IOT_CONFIGURATION dictionary with following properties:
        * id
        * influx_url
        * influx_org
        * influx_token
        * influx_bucket
        * configuration_refresh
        * default_lon
        * default_lat
        * measurement_interval
    """
    global config
    global config_received
    global influxdb_client
    global write_api

    # Check freshness of configuration
    if config_received and (datetime.utcnow() - config_received).total_seconds() < config['configuration_refresh']:
        return

    iot_center_url = os.getenv("IOT_CENTER_URL", "http://localhost:5000")
    iot_device_id = os.getenv("IOT_DEVICE_ID")

    # Request to configuration
    config_fresh = fetch_json(f'{iot_center_url}/api/env/{iot_device_id}')

    # New or changed configuration
    if not config and config_fresh != config:
        config = config_fresh
        config_received = datetime.utcnow()
        influxdb_client = InfluxDBClient(url=config['influx_url'],
                                         token=config['influx_token'],
                                         org=config['influx_org'])
        write_api = influxdb_client.write_api(write_options=WriteOptions(batch_size=1))
        print(f'Received configuration: {json.dumps(config, indent=4, sort_keys=False)}')
Type annotations
If you’re not familiar with the syntax in
def write() -> None, this is a type annotation. For more information, see PEP 483.
Writing data to InfluxDB
def write() -> None:
    """Write point into InfluxDB."""
    geo = sensor.geo()
    measure = sensor.measure()
    point = Point("environment") \
        .tag("clientId", config['id']) \
        .tag("device", "raspberrypi") \
        .tag("TemperatureSensor", "bme280") \
        .tag("HumiditySensor", "bme280") \
        .tag("PressureSensor", "bme280") \
        .field("Temperature", measure.temperature) \
        .field("Humidity", measure.humidity) \
        .field("Pressure", measure.pressure) \
        .field("Lat", geo['latitude']) \
        .field("Lon", geo['longitude']) \
        .time(datetime.utcnow())

    print(f"Writing: {point.to_line_protocol()}")
    write_api.write(bucket=config['influx_bucket'], record=point)
Batching
Uses batching writes. This line in the configuration funtion controls batching:
write_api = influxdb_client.write_api(write_options=WriteOptions(batch_size=1))
Measuring the environment
Data comes from bme280 sensor connected to the I2C bus. Produced fields: “temperature”, “humidity”, “pressure”.
The measure() function is a method for the [Sensor class][Sensor].
def measure(self):
    """
    Get measure from bme280 or default values.

    :return: Returns object with properties: temperature, pressure and humidity.
    """
    if self._bme280:
        import bmp_sensors as Sensors
        self._bme280.SetMode(Sensors.BME280_Mode.FORCED)
        return self._bme280.Measure()

    obj = lambda: None  # noqa: E731
    obj.temperature = 10.21
    obj.pressure = 983.72
    obj.humidity = 62.36
    return obj
Further reading
- Prototyping IoT with InfluxDB Cloud
- IoT Prototyping with InfluxDB Cloud (Part 2): Queries, Tasks and Dashboards
- TL;DR InfluxDB Tech Tips; Creating Tokens with the InfluxDB
- TL;DR InfluxDB Tech Tips; Creating Buckets with the InfluxDB API
- Data Layout and Schema Design Best Practices for InfluxDB
- TL;DR InfluxDB Tech Tips – How to Interpret an Annotated CSV
- Getting Started with JavaScript and InfluxDB 2.0
- Getting Started with Python and InfluxDB v2.0
- Getting Started with InfluxDB and Pandas